Putting Augmented Reality Holes In Your Floor
Android and iOS both now have nascent augmented reality frameworks which brings AR tantalisingly close to lots of peoples' pockets, including mine.
Here are the results of my first foray, in a couple of cold evenings this winter (2017/18).
Getting A Mobile AR App Working In A Single Evening
The first step, which is often troublesome, is getting the right combination of tools, SDKs and components together, configured and running.
I was lucky to hit upon one quick and easy route to get started so here it is for those interested.
Caveat: I'm an Android user which has coloured my decision-making below. I'm 98% certain a similar procedure is available for iOS folks using ARKit.
Prerequisites:
- An Android device with ARCore support: Pixel, Pixel 2 or Samsung Galaxy S8 (at time of writing)
- Android dev environment: Android 7.0+ SDK (API level 24 or above), Android SDK build-tools (v24 or above)
- Unity game engine with Android build support (2017.3.0f2 or above)
- ARCore SDK for Unity
Steps:
- Set up Android dev environment
- Prep your Android device
- Install Unity
- Load, build and run HelloAR Unity sample project
My First AR Object: A Hole
The demo that comes with ARCore lets you litter your floor with Andy androids, which is nice and all but I wanted to produce something of my own. I settled on the idea of placing a "hole" flush with a surface in the AR scene. My hole would appear like a sunken space inside a real world surface.
Now we know how many holes it takes to fill the Albert hall.
- The Beatles (1967)
Step 1. Build An Inside-out Box
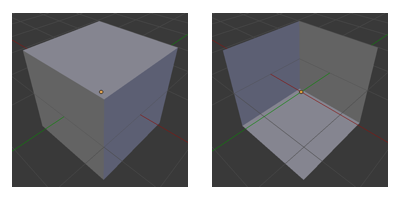
Did you know: computer generated surfaces are often single-sided. One side is visible and the other invisible. When designing a 3D surface, one can decide which direction each face ...erm... faces by giving it a 'normal' pointing outward.
Most computer generated boxes are meant to face out towards the world. We want to show the inside of the box though, so we'll turn it inside out by inverting the normals on each of the box's walls.
Using Blender
To get the inside-out effect in the excellent Blender 3D modeller, you can follow these steps:
- Create a new scene (which happily includes a cube)
- Hit
Nto show the properties panel - In properties, under shading, enable 'Backface culling'
- Hit
Tabto switch to edit mode - Hit
Ato select everything - Hit
Spaceto open the search menu - Type
flip normalsand hitReturn
Now we can see the box's insides but we can still see the inside faces when looking at the box from the side. This gives a slightly jarring effect which we'd like to avoid and we also want to sink the box into the ground so it's only visible from directly above.
Step 2. Make It Visible Only From Above
In effect we want to hide the box from the viewer unless they're looking down on it. Modern 3D hardware gives us a way to manage that through so-called "stencil" effects.
Aside: Stencils
Stencilling, in the context of 3D graphics, is the act of masking out a region to single it out for special treatment. With this technique, we can draw 2 objects: a "stencil mask" and a model for the user to view "through" the mask.
To show our inside-out box from above only, we make a second 'proxy' object, just a quadrangle which defines the region in which we can see the box. Then we place our proxy on the top surface of our box.
Step 4: Building A Stencil Effect In Unity Shaders
Unity exposes stencilling features in its shader language which makes it relatively easy to build stencil and materials.
The Stencil Shader
The stencil material is responsible for writing to a "stencil buffer" which is like an image whose pixels can be used in other shaders to show, hide or alter parts of the scene.
Firstly, we want stencil objects to affect normal geometry so we render them first:
Tags { "Queue" = "Geometry-100" }
We also want stencil objects to write a predefined mask value to the stencil buffer:
Stencil {
  Ref[_StencilMask] // Use the value of the _StencilMask property
  Comp always // Write without checking the current value in the buffer
  Pass replace // Replace what is already in the buffer
}
Here's a gist with the whole stencil mask shader.
The Masked Object Shader
To render an object only where the stencil buffer has a particular value, we can augment an existing shader with an appropriate Stencil clause:
Stencil {
  Ref[_StencilMask] // Use the value of the _StencilMask property
  Comp equal // Render our object only when the stencil buffer value equals our reference value
  Pass keep // Keep the current stencil buffer value when the test passes
  Fail keep // Keep the current stencil buffer value when the test fails
}
Here's a whole surface shader which honours the stencil buffer.
Step 4: Finishing Up
Now we can create a material using our masked shader for our inside-out box and another for our proxy quad object using the stencil shader.
The result looks something like this:
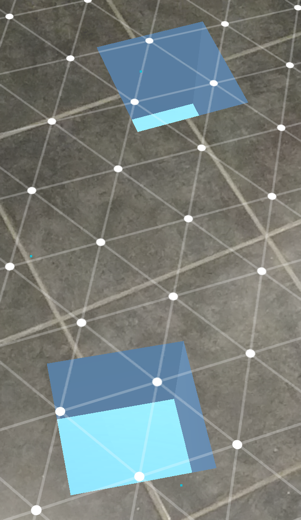
For the interested, here is a Unity package containing a prefab including geometry, materials and shaders.